In previous posts we have been configuring Webpack / React / Babel and webpack-dev-server in order to run a very basic application.
I todays article I will teach you how to integrate Sass for doing the styling on the app.
If you are here without reading the previous post, I would recommend you to go ahead and read with, worst case scenario you will learn something new. If you already have your project, keep reading.
Step 1: Dependencies
We will need sass-loader, node-sass, css-loader, and style-loader. First I’ll try to explain how those libraries work, and then we will inject them into our webpack configuration.
Whenever webpack detects a scss or sass file it will process it with several loaders.
First we have scss-loader which it’s only task is to compiles sass into CSS. Internally scss-loader will need a sass compiler obviously, that compiler is written in C++ and is called LibSass. In order to make LibSass to work with our node app, we will need node-sass.
Then, after we have our CSS hot and ready we will pass it to the next player which is our css-loader. This loader will transform our CSS into CommonJS, yes you read it well, CSS into JavaScript. Remember that webpack produces a bundle.js file? Well, at the end of the day, everything needs to be JavaScript. css-loader will help us with that.
Finally, when we import our bundle.js created by webpack, we will need some instructions inside that bundle in order to import those javascript styles into real CSS again. That’s where style-loader will be handy.
Now that you know why we need those dependencies, let’s install them as dev dependencies.
The Regex /.s[ac]ss$/ will help us to process any SCSS or SASS files
See how the loaders are in a certain order, that’s important because they act like a pipe in unix. The result of a loader is passed to the next one.
Step 3: SCSS
You can import Sass/SCSS files from any component from now on, let try to import a style file in our Homepage component.
I created a style inside public/stylesheets/styles.scss, our current file structure would be something like this.
index.html
package.json
webpack.config.js
public
-- stylesheets
---- styles.scss
---- index.js
Inside our index.js we created a component called MyComponent. Let’s import our styles.scss file there.
# public/index.js
...

import './stylesheets/styles.scss';

const MyComponent = () => {
  return (
    <div className='wrapper'>
      <h1>This is my first component</h1>
    </div>
  )
};

...
What will happen is, webpack will process the index.js file, and when it tries to resolve all the imports there, a scss file will be detected and all our loaders are going to take care of that.
I added a wrapper class to our main div of MyComponent, let’s add some basic styles just for testing.
We will setup webpack-dev-server for running our project using a web server. Here is the repository link in case you want to start with the project we made in the previous chapter. https://github.com/echavezNS/basic-react
Step 1: Install library
Let’s install webpack-dev-server in out project with the next command
npm install webpack-dev-server --save
–save: will save a reference for our library in our package.json file.
Step 2: Server script
Now, let’s create a new script in our package.json file.
"scripts": {
  "server": "webpack-dev-server"
},
This creates a new script called server which we can run with npm run server in order to run a web server, internally webpack-dev-server will use express for running the server.
ℹ 「wds」: Project is running at http://localhost:8080/
ℹ 「wds」: webpack output is served from /
ℹ 「wds」: Content not from webpack is served from basic-react
ℹ 「wdm」: Hash: b36fd9085373ec73fdf5
We can configure things like, which port do we need for this server to run on, what’s the path where assets will be virtually host, do we want to compress our hosted files (gzip).
All this can be done within the webpack configuration.
This is probably one of the most complex things I got stuck when I was working with webpack-dev-server for the first time, I didn’t know how assets works on web app. Linking frontend with backend in order to serve the assets can be a complicated at first. Let me try to explain.
When you run an express app, you normally need to indicate where the assets are going to serve from. This is because this is a way to express to track which files can be cached or not. Assets like images, javascript files, css files normally shouldn’t change at all.
As I explain webpack-dev-server uses express. So, through our webpack-dev-server configuration we can tell this express server to serve those assets from a certain route. For example:
/assets/bundle.js
/public/bundle.js
/myassets/bundle.js
/other/bundle.js
Normally what you would do is to match this assets route with whatever real server you will end up using in production. Kind of complex right?. You just need to remember that assets will be serve from either a custom route, or by whatever value you have in the output.path key.
Let’s serve our assets from /assets, in order to do that, we need to add a publicPath key inside the output section.
When working with an old school React app. It is highly possible that Webpack is involved in the base setup.
In this guide I would like to teach you how to setup a basic React app using Webpack and Babel. But first we need to understand some concepts.
React
Webpack
JSX
Babel
If you already know all of this, please jump to the Steps section (click here)
React
React is a library that uses components for building UI. All you need to know about React is:
It uses Components, and every component normally represents a piece of UI in your app.
Components are Functions
<MyComponent /> = function MyComponent() { ... };
Those functions must return a React component (normally JSX).
function MyComponent() {
  return React.createElement("h1", null, "Hi");
}
JSX it’s an extension of React for writing React elements as HTML (But remember, it’s not HTML).
function MyComponent() {
  return <h1>I'm not HTML, I'm JSX</h1>;
}
You can pass properties (props) to components like you do with HTML tags.
<MyComponent name="Jorge" role="frontend" />
Components also have a life cycle, you can identify some callbacks when rendering a new component, like componentDidMount, componentWillUnmount, etc.
And other crazy things…
Webpack
Normally when creating a web application, you will have a main index.html and then you will import JS/CSS files.
A React app it’s quite similar, but consider that every file that you import needs to be imported it in a certain order for working correctly.
This how normally a web application structure would be:
Webpack will create a bundle of all the imported files that you are using in your app, including JavaScript libraries, CSS, etc.
Webpack is a little bit more complicated than that, you can package more than one bundle, and if you are using things like SCSS, TypeScript, or any other web technology. You can configure webpack to bundle those kind of files too.
Let’s start with some steps for configuring webpack.
Step 1: Basic Scaffold
We will start by generating our main folder directory. Let’s call it basic-react and then enter to this new directory.
mkdir basic-react
cd basic-react
Create a package.json file with the command npm init -y.
-y is a parameter that tells npm to create a package.json with the most basic possible information.
This is what we have right now:
basic-react
-- package.json
Step 2: Install dependencies
We will need to install a few dependencies for having everything setup correctly, install this libraries with the --save or --save-dev arguments for saving the references inside the package.json file.
mode: webpack can do different stuff depending of the mode environment (production, development, etc). By default webpack uses development if we don’t tell a specific mode.
entry: This is the path where webpack will try to search for a root file to start chaining our bundle. By default webpack search into src/index.js
output: We need to tell webpack an absolute path of where our bundle is going to be created.
If we don’t specify any configuration to webpack, it will try to look for a an entry file in src/index.js and the final output will be placed in dist/main.js.
Since our basic-react project doesn’t have the src/index.js file, then it will throw the next message:
ERROR in Entry module not found: Error: Can't resolve './src' ...
Try to run npm run build in order to verify that.
In order to configure webpack ourself, we need to create a configuration file.
Let’s create a webpack.config.jsfile in the root directory.
This means that if we write something in our public/index.js file, and then run npm run build it will ends out in dist/js/bundle.js file.
Our configuration is not ready yet, but we can say the base is already done.
Now, let’s integrate @babel/core so we can write ECMA6 in all our JavaScript files with no problem.
Loaders
Loaders are some kind of modules that helps webpack to integrate new libraries in order to process every single file with some kind of compiler. We can represent it with the next image:
For example, if use ECMA6, we need to teach webpack how to transform ECMA6 into standard JavaScript, this is where the loaders are useful.
We need to teach webpack how to compile ECMA6 -> JavaScript.
test: It’s just a regular expression for every processed file in out chain, in this case we are telling webpack “Hey, use babel-loader only in javascript files”.
exclude: We are just saying “Do not process any file inside node_modules folder, this is because this would take a lot of time, and normally node modules already have a dist version.
loader: The name of the loader we will use for the previous rules.
There are a lot of different configurations you can use inside every rule, but in this tutorial we will only use the basic stuff. Try to read the webpack documentation for reference.
Step 5: Create your HTML file
Now that we are processing all our JS files with @babel/core which transforms our ECMA6 into a more standard JavaScript, we need to insert our bundle in an actual HTML.
Let’s create an index.html file in the root directory
Notice that we have a <div id='root'></div> element, we will insert our whole app inside this div.
Let’s test everything we have done by doing a console.log(“hello world”) inside our public/index.js file, running our npm run build command and then opening our new index.html file. You should see “hello world” inside the console.
Perfect! We are almost there.
Step 6: Create your first component
Now, we can start with React. If you don’t know anything about how to write react components or how to insert them inside the DOM. I highly recommend you to read the Getting Started guide from the react documentation page.
Check the next code:
import React from 'react';
import ReactDOM from 'react-dom';

const container = document.getElementById('root');

const MyComponent = () => {
  return (
    <h1>This is my first component</h1>
  )
};

ReactDOM.render(<MyComponent />, container);
We are doing two things basically:
Creating a component
Inserting the component inside our <div id='root'></div> container.
Once you have this, run the build script and…
A huge error telling you “Hey dude! I don’t understand what is that "HTML" inside the JavaScript file” This is completely normal since babel doesn’t know how to read JSX.
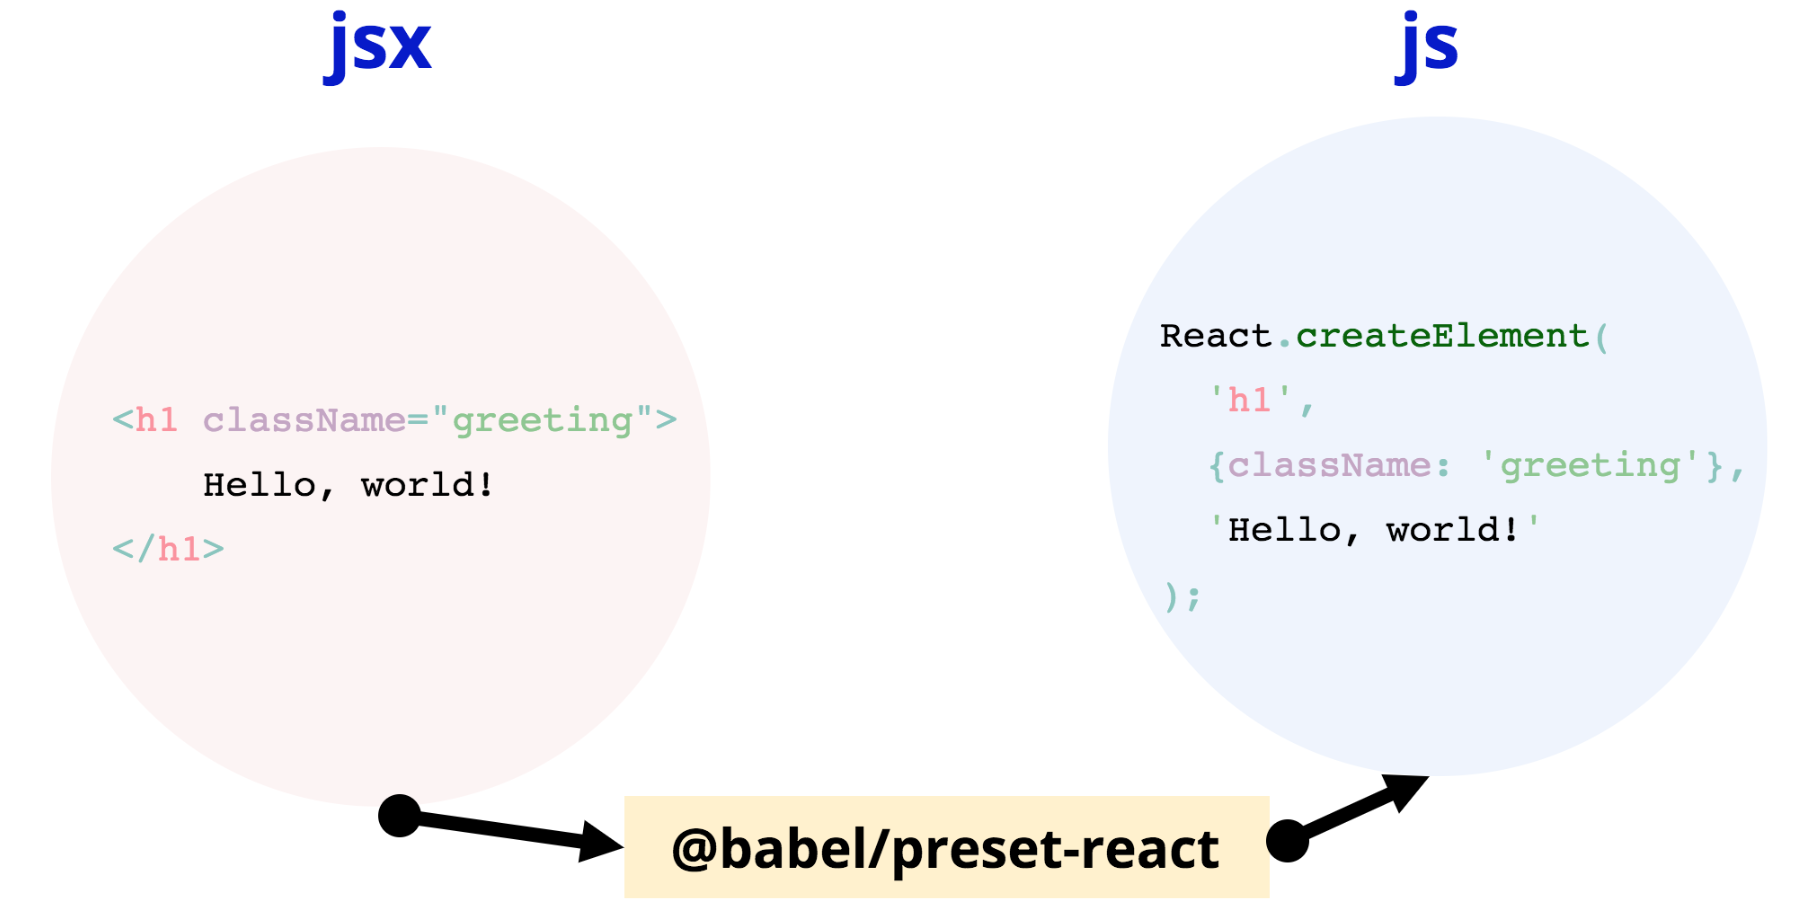
Step 7: Teach JSX to Babel
By default, Babel doesn’t know how to transform JSX into JavaScript, here is where our library @babel/preset-react takes place.
Let’s tweak a little bit our webpack configuration:
With this, now we can run our build script this no problem, Babel will know how to transform JSX into JavaScript, and our components will render correctly.
Note: We are injecting @babel/preset-react inside the webpack configuration, but you could do it in your .babelrc file too.
Try to open your index.html file, it will render our h1 tag correctly.
We are pretty much done for this post, if you have any questions try to reach me through my twitter @jorgechavz.
Probably you noticed that you have to run npm run build every time you make a change in your public/index.js file. There is something we can do about it, we can use webpack-dev-server in order to run a server locally which will be handy when you want to develop fast, it will have some really cool features including hot reload so we can se our changes instantly.